

Hello BEAUTIES! Happy Wednesday, we’re halfway through the week! Yay! 🙂 I’m super excited for today’s post because it’s a DIY tutorial and I have not done one of these in a long while! Check out previous DIY’s in the tutorials category of the blog. When I was first teaching myself how to sew following along with DIY’s and free patterns was how I got started. I love learning from other creative people in the community because they’re so willing to share what they’ve learned and pass it on to others. Whether you’re a newbie or you just want a fun DIY + Hack to follow along with, I’ve got your covered with today’s post!
RTW Inspiration – Tie sleeve tops have been everywhere on fashion blogs and in stores and I’m 100% positive we’ll be seeing more in the months to come so I wanted to get this up for you and get your mind going with all the possibilities! 🙂 The Sophia Flare side split hack came from what I’ve been seeing around in high fashion magazines and online stores, like this version from Barney’s for $245! I’ve included some RTW inspiration for Sophia below that inspired me to make the pattern.

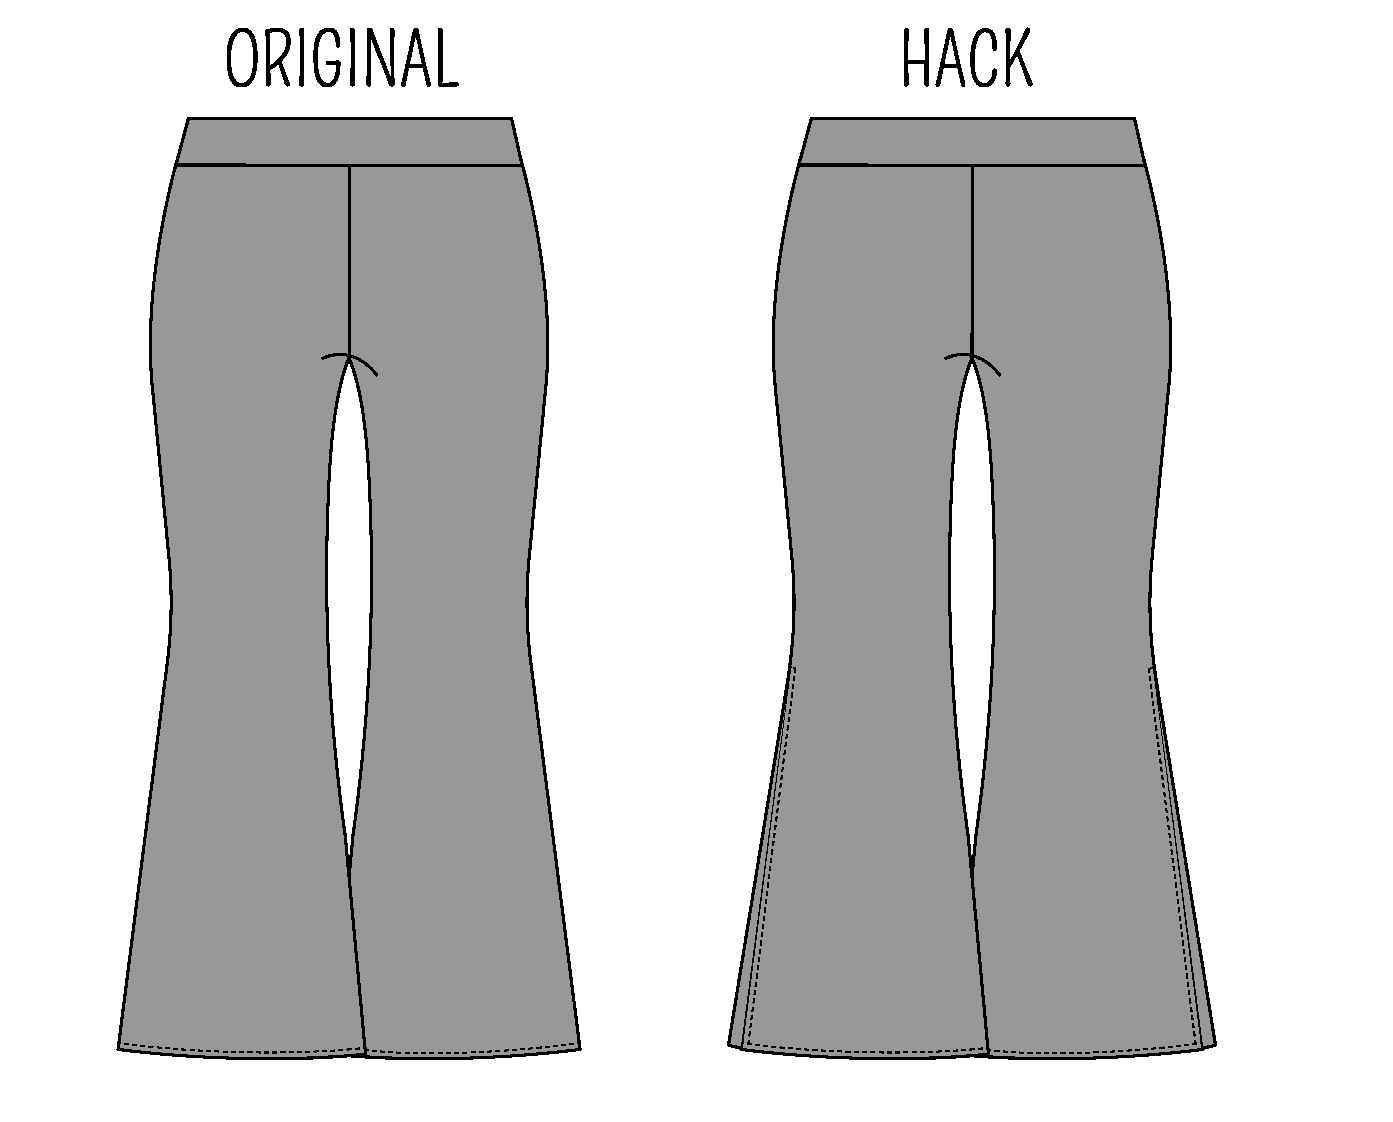
Okay now for the fun stuff! Let’s start with the Sophia Flare hack! 🙂 The look is SO easy to re-create just follow the steps below:
SOPHIA FLARE HACK
This is such an EASY modification, here’s what I did!
Pattern: Sophia Flares.
Size: XXS -XXL, I cut size XS.
Fabric: Ponte Knit.
- On step 3 of the pattern instructions when pinning at the side seams, stop sewing 18″ from the bottom hem.
- Press the seam open.
- Topstitch the hem in place and pivot at the side slit opening.
- Try on the pants and determine how much you need to hem. Sew the lower hem. That’s it! 🙂 Grab your Sophia Flares and try out the awesome hack!

DIY TIE SLEEVE TOP TUTORIAL
FAQ’S – (Q) What sewing machine do you use? (A) I use a *Project Runway PC – 420. Another great and more affordable option is the *Brother CS600i.
Now let’s jump into what you’ll need to make your DIY Tie Sleeve Top! 🙂
MEASUREMENTS:
• upper bust circumference + 1”
• upper bust circumfernce divided by 2 + 1”.
• armpit down to desired length + 1”.
• bicep circumference x 2.
SUPPLIES:
• 1-2 yards woven fabric
• pattern paper (optional)
• measuring tape
• ruler
• pencil/marking tool
You may also download this handy DIY Tie Sleeve Top PDF to write down your measurements. Cut out your fabric pieces according to your measurements and follow along with the step by step tutorial below. Remember to download your Sophia Flares to complete the look! 🙂

STEP BY STEP TUTORIAL
 1. Once you’ve taken your measurements using the DIY Tie Sleeve PDF sheet or using the instructions above, cut out your fabric pieces.
 2. Make a center notch on the fabric and pattern pieces by folding the pattern in half and marking the middle fold of all pieces except for the arm ties.
3. Grab one ruffle piece and gather along the long end by sewing a basting stitch 1/2″ away from the raw edge and again 1/4″ away from the previous stitching. Check out this “How-to Sew Perfect Gathers” tutorial for more help.

4. Pin your front band to your gathered ruffle front matching the center notches and adjusting the gathers evenly, sew together with 1/2″ seam allowance.

5. Serge your raw edges or finish with your desired method. Fold the fabric with wrong sides together so that the upper edge slightly overlaps the seam-line.

6. Pin from the right side of the fabric and edge stitch close to the seam-line on the front band.

7. Pin your back band to the back ruffle with right sides together as shown above.
8. Sew the back band to the back ruffle with 1/2″ seam allowance. Finish your raw edges as desired and repeat steps 5-6. 
9. Next cut a piece of 1″ elastic using your upper bust measurement divided by 2, + 1″.

10. Insert your elastic through the casing using a bodkin or safety pin, stop before the elastic feeds completely through and tack that side in place. Continue feeding the elastic through and tack the other end down, completing your elastic casing. 
11. Next sew your front to your back with right sides together at both side seams.
 12. Seam 1/2 hem at the lower edge.
 13. Place two sleeve ties right sides together at the short ends. Pin and sew.
14. Press the seam open. 
14. Fold the tie onto itself with right sides together. Pin and sew using 1/2″ seam allowance leaving 1″ opening at the seam.  15. Use a bodkin or safety and pull the tie with right sides facing out through the 1″ opening. Fold the seam allowance of the opening to the wrong side and topstitch closed.
16. Pin the seam of the sleeve ties to upper side seams of the top.  17. Topstitch the sleeve tie to the top using a straight stitch. Repeat steps 13 – 16 to the remaining sleeve tie.

 Enjoy your DIY Tie Sleeve Top! Tag @rosypena in your photos if you try this tutorial, I would love to see! Check out the style photos below and grab your Sophia Flares to complete the look! – XO Rosy.


Thanks for reading Beauty!
Check out Rosy Peña Patterns for even more sewing goodness!
Stay Connected: @rosypena @rosypenapatterns
XO!
![]()