

Hello Beauties! Yay it’s Friday! As always I hope you all had a great week! It’s been a busy but interesting one for me! Yesterday I found out I was chosen as a finalists for the “Mood Made May 2016” Sewing Contest. I entered through Instagram with a hashtag on a few makes using Mood Designer Fabrics. I was SO pleased when I found out I was chosen, it feels great to know someone admired your work. Although I’m positive I won’t receive the overall “Win” through the Facebook contest, I am forever grateful to even be chosen! Thanks to anyone who votes for me and thank you to anyone who reads/supports my Blog! You all mean the world to me!
Through this week I’ve slowly but SURELY got this DIY Leopard Clutch Tutorial together for you all! I’m a sucker for a good clutch, you can use them to style up so many different looks. I REALLY think you all will love this! This is a PERFECT weekend project! Hashtag your makes on social media with #ROSYPENA so I can see your work! I would LOVE it! 🙂 All my Social links are here on the blog at the very bottom of the page. I won’t keep you all too long today! Enjoy the Tutorial! XOXO
💖 SHOP MY PATTERNS: ROSYPENAPATTERNS.COM 💖
Supplies:
- 2 Fat quarter’s: 1 for your outer fabric, and 1 for your lining.
- 3/8 yard of heavyweight one sided fusible interfacing
- Fabric scissors
- Pins
- Coordinating Thread
- Seam ripper ( in case you make a mistake and need to rip out stitches)
- Paper to make your pattern pieces (you can use any type of paper here, even tape some pieces together to make the size we need) I personally use FREEZER PAPER
when making any kind of patterns, it comes in a good size roll and works well for what I need.
- 90/14 NEEDLE
(I like to use a bit bulkier of a needle like this one to get through the heavy weight interfacing)
- 14-18″ metal zipper (I used an 18″ jacket zipper in the tutorial).
- Pattern weights
- Zipper foot (these come standard with most sewing machines)
- Patten Pieces, explained below.


For our Clutch Pattern pieces, cut one rectangle 13″ x 10.5″ this will be our main pattern piece that we will cut 2 pieces of our fashion fabric and 2 out of lining. For the interfacing pattern piece you want to cut out a rectangle 12″ x 9.5″ Make sure you write clearly on your pattern pieces so you can know what to do and can re-use again, and again! 🙂

Open out the fat quarter and iron them flat at your ironing board.

Take the bottom of shorter ends and bring them up toward the top right sides together.

Both shorter ends are now up to the top, right sides together.

Take your main pattern piece and place it on top of your fashion fabric use your pattern weights to hold down the patten piece and cut around with your fabric scissors or rotary cutter. Repeat this step for your lining fabric.

You should now have two rectangles cut out from your pattern piece! 🙂

Open them up and since we place the fabric right sides together and cut around we end up with two separate fabric pieces of both the fashion fabric and the lining.

Now we need to cut out our interfacing, grab your INTERFACING pattern piece and cut out two separate rectangles using the pattern.

Like below.

Now grab your fashion fabric pieces and place them WRONG sides up and place the “bumpy” side of your interfacing down on top of the wrong side of the fashion fabric. (So wrong side of fabric to bumpy side of interfacing)

Like below.

Use YOUR manufacturer’s directions on your interfacing package that you purchased and fuse the interfacing to your fabric. I am placing my iron on top of the interfacing making sure i’m not ironing on the bumpy side of the interfacing but the fuzzier side. (If you place an iron on the bumpy side you will melt the glue to the iron)! You can also use a press cloth here if you choose. Again, follow YOUR manufacturer’s directions on your interfacing package. Fuse the interfacing to the fabric.

I like to press the right side of the fabric as well.

Now your interfacing and your fashion fabric are one piece. 🙂

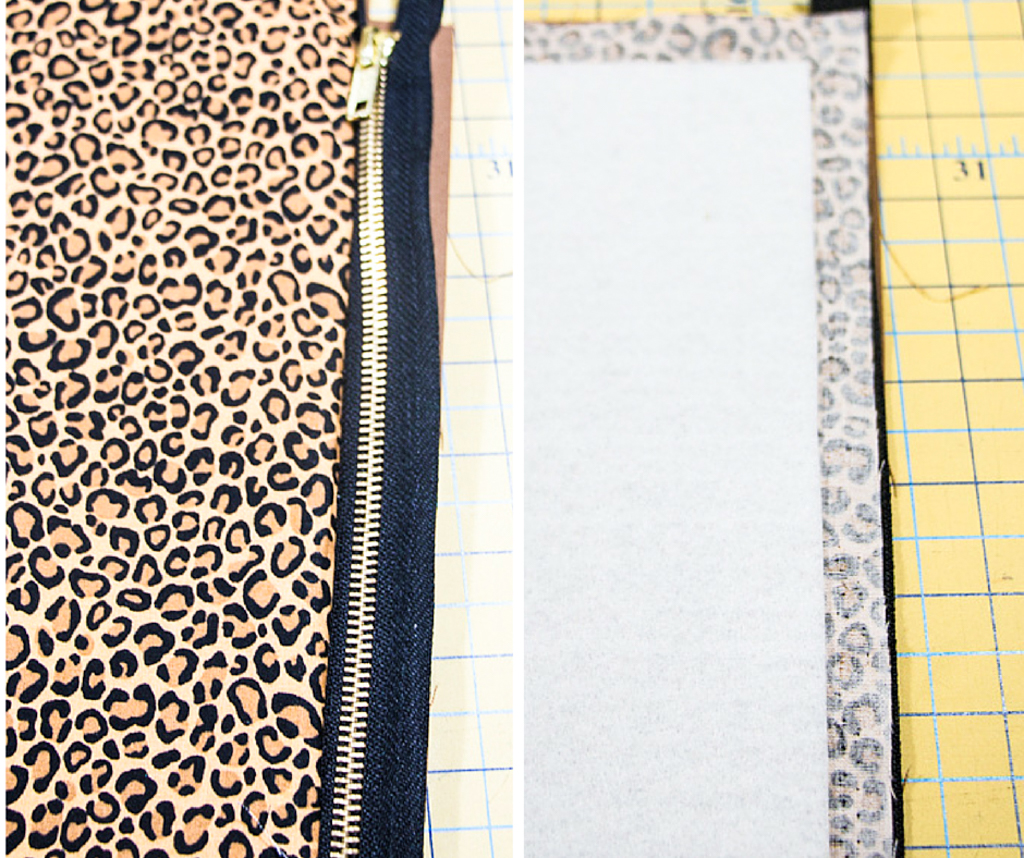
Place the right side of your fashion fabric up, and place your zipper right side down on top of the long side. Put your lining piece on top right side down with the long edge of the lining matching the long edge of your fashion fabric and the zipper tape. Creating a “sandwich” Pin in place.

Make sure you have your zipper foot attached and sew along the length close to the zipper teeth, making sure to catch all layers of fabric and zipper tape. (Don’t sew over zipper teeth, sew along side of it).

Open out your lining and press. Topstitch along the length of the lining close to the zipper teeth making sure to catch the zipper tape underneath.

Now you want to repeat the above steps for the other side of the zipper tape and the remaining fashion fabric and lining piece. It can get a little tricky here so to help I like to close the zipper and make sure I’m “sandwiching” the pieces correctly. Remember the fashion fabric to the right side of the zipper tape (the side that has the zipper pull) and the right side of the lining is facing the wrong side of the zipper tape. Pin and sew in place just like before. Remember to also topstitch along the lining.

Now open out your zipper about halfway. We are going to need this open after we sew our clutch together to turn it right side out. Be sure to open it up before moving on to the next step.

Now place your fashion fabric right sides together. Repeat for your lining, right sides together. Pin all the way around to keep it in place, and leave about a 4-8″ opening in the middle of your LINING. (Marked with a pink line below on the right).

Take it to your machine and switch back to your regular foot. I like to start just past my zipper teeth (You do not want to sew over your zipper teeth, you will break your needle against the metal teeth) So make sure you start past your zipper not through your zipper. Put your needle in and sew with a 1/2″ seam allowance, removing your pins as you go along.

When you get to the point where we want to leave the opening stop and backstitch. Start again at the other side of your opening and backstitch, continue sewing until your meet your zipper again stop and backstitch. Then you are going to start again on the other side of the zipper and finish sewing around until you meet the other end of the zipper, stop and backstitch.

At this point you should have sewn all around your clutch leaving the 4-8″ opening in the lining. Clip your corners to remove some bulk (do not cut through your stitches, just the corners within the seam allowance). Place your hand in through the opening of the lining and through the opening you left when we pulled our zipper open halfway. Grab a corner of the inside of the main piece and pull it right side OUT through the lining hole. This can be a little fiddly but it will come out.

Now you want to turn the raw edges of the hole from the lining slightly in so we don’t see the raw edge and press. Like below.

Pin along the opening edge.

Take it to your machine and topstitch along the opening to sew it shut.

Turn your lining inside the clutch and take it to your ironing board! We are almost done! YAY! 🙂 Press it flat!

Now fold over the top toward the bottom about 1.5″ – 2″ from the bottom! Press.

Congratulations! You are all finished with the “Skinny” Leopard Clutch Tutorial! Go OUT and ROCK it! 😉

I REALLY hope you enjoyed this tutorial! Please Share Like and Comment! Love you all! XOXO Don’t forget to hashtag your sewing makes from my tutorials! #ROSYPENA


 ‘STAY CONNECTED!
* INSTAGRAM – PINTEREST – FACEBOOK – TWITTER – YOUTUBE *
One thought on “DIY “Skinny” Leopard Clutch Tutorial”