

Hi BEAUTIES! Happy Tuesday! Today I’m sharing a super quick Bell Sleeve tutorial that I actually photographed a few months ago and for some reason did not post along with THIS fabulous look! Check out the tutorial below to see how I hacked a basic sleeve pattern into these gorgeous DIY Bell Sleeves! 🙂
It’s super easy to do and you can apply this concept to several other pattern hacks such as a flounce or even slash and spread in the same manner to an entire sleeve for more of a trumpet look, the options are endless! 😉 Photos and step by step tutorial for you below! Enjoy! XO
💖 SHOP MY PATTERNS: ROSYPENAPATTERNS.COM 💖

DIY Bell Sleeve Tutorial
Supplies: *You can apply this tutorial to any basic sleeve pattern*
- Measuring tape
- Straight ruler
- Hip curve ruler (optional)
- Tape
- Pencil
- Calculator
- Tracing wheel
- Paper scissors
- Drafting paper (scrap paper, freezer paper, dotted paper, etc.)
- McCall’s 6886 long sleeve pattern piece #6 (used as a template to get the long sleeve shape, you can use any knit long sleeve pattern that fits you)
- Very Easy Vogue 8896 short sleeve pattern piece #4

Steps: (see image above)
- Measure from your high shoulder point down to your elbow, write down the measurement.
- Lay pattern piece #4 over pattern piece #6 aligning the center dots at the shoulder (the pencil is pointing to the dot).
- Trace along the sleeve head of pattern #4 with your tracing wheel.
- When you reach the sides use your ruler to blend the underarm of pattern #4 into pattern #6. Trace around the longer sleeve shape of pattern #6 (some of pattern piece #4 may be shaved off around the underarm).

Steps Continued: (see image above)
- Transfer all of the markings from the sleeve head on piece #4.
- Measure from the center dot down using the measurement taken in step one, make a mark.
- Draw a straight line across the width of the pattern at the marking, this represents your elbow line.
- Cut out your pattern using paper scissors. Also cut across the elbow line, separating the pattern into two pieces.

Steps Continued: (see image above)
- Make notches on both patterns to indicate where they will be sewn together. Use a single notch for the front side and a double notch for the back.
- Measure along the bottom edge of the lower sleeve pattern. Write the number down and divide by four.
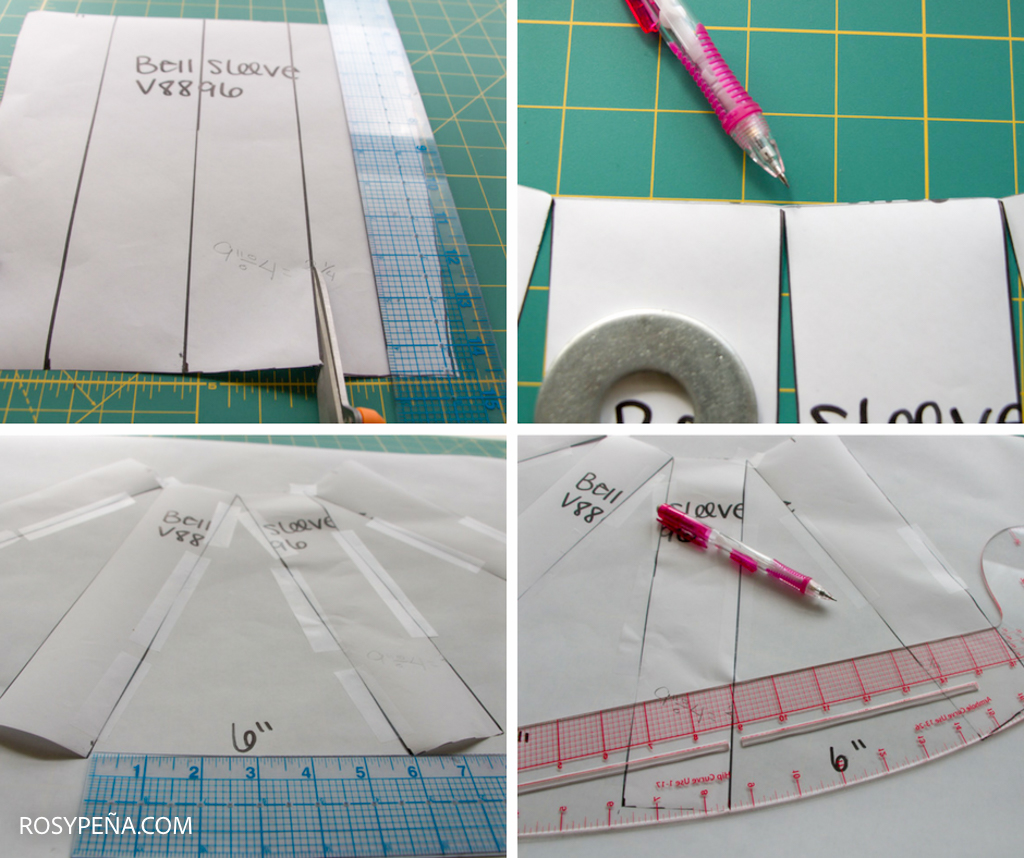
Steps Continued: (see image above)
- Make 3 markings along the lower edge using your calculation (ex. my lower sleeve is 9”, divided by 4 gave me 2 1/4”, so I made a marking every 2 1/4”).
- Draw a line straight up at each marking. Cut along the lines leaving about 1/16″ of paper uncut at the top (to create a hinge).
- Place your pattern on a new sheet of paper and separate each column by 6”, starting at the center. (you can insert as much or as little room to make the bell shape of your choice. I used 6”)

Steps Continued: (see image above)
- Once you’ve made your insertions use your hip curve ruler, or freehand a connection between the spaces at the lower edge of the pattern.
- Repeat the previous step to smooth the curve at the upper edge of the sleeve.
- Transfer your pattern onto a fresh sheet of paper and add seam allowance to the top and bottom of the bell sleeve. Also add seam allowance to the lower edge of the upper sleeve. I used 1/4”, you are free to use any seam allowance you are comfortable with.
Note: You can line the bell as I’ve shown or simply fold and sew a hem of your choice. Curved edges are a little tricker to hem so you may want to use a lining or create a hem facing. To make a hem facing simply trace the lower edge of your bell by about 2″ and make a separate pattern piece using that. Add your seam allowance and sew! 🙂
That’s it! Label your pattern pieces and go sew some fabulous bell sleeves!
Check out THIS post to see all the photos on this previous look. 🙂


‘STAY CONNECTED!
* INSTAGRAM – PINTEREST – FACEBOOK – TWITTER – YOUTUBE *
I love it, thank u for showing your subscribers how to do a bell sleeve. Keep them coming
Thank you Brandi! I debated even posting it but I figured there are several people who may what to learn how and it really is super easy! I’ll keep them coming. XO